Add / Edit Item
Add / Edit Item is probably the most used action, and therefore probably doesn't need much explanation. Nevertheless, this article describes the action on a tecnical level and provide you with some tips and tricks.
(In this article, each time the Edit Item action is mentioned, the same applies for the Add Item action.)
Edit Item pre-checks
Before an item is opened in edit mode, a number of checks is performed first:
- Does the current user have sufficient content access rigths on the item?
- Is the item called out to another user / to a usergroup the current user isn't a member of?
- Does the item have a current (workflow) status the current user doesn't have access rights for?
- Is there a itemlock in place? (If not, an itemlock will be set for this specific item for the current user.)
If one of the pre-checks fails, an exception is thrown or the item is opened in read-only mode.
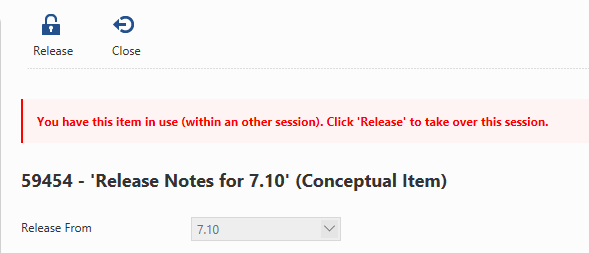
In case of an itemlock, a specific message is shown and dependent on the conditions, you may get the option to release the itemlock.
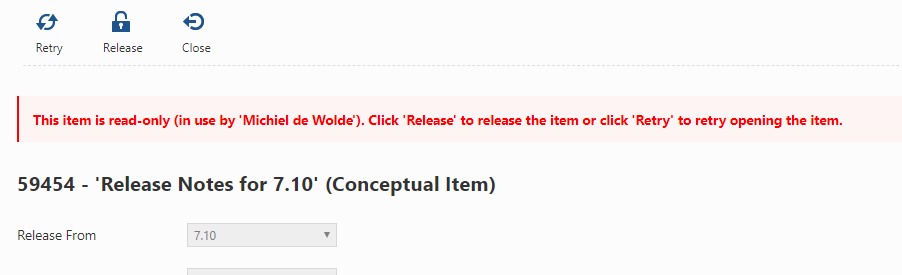
It may even occur you own the existing itemlock yourself:
Edit Item
Dependent on the contenttype and the user role, an typical Edit Item action could look like the example shown below.
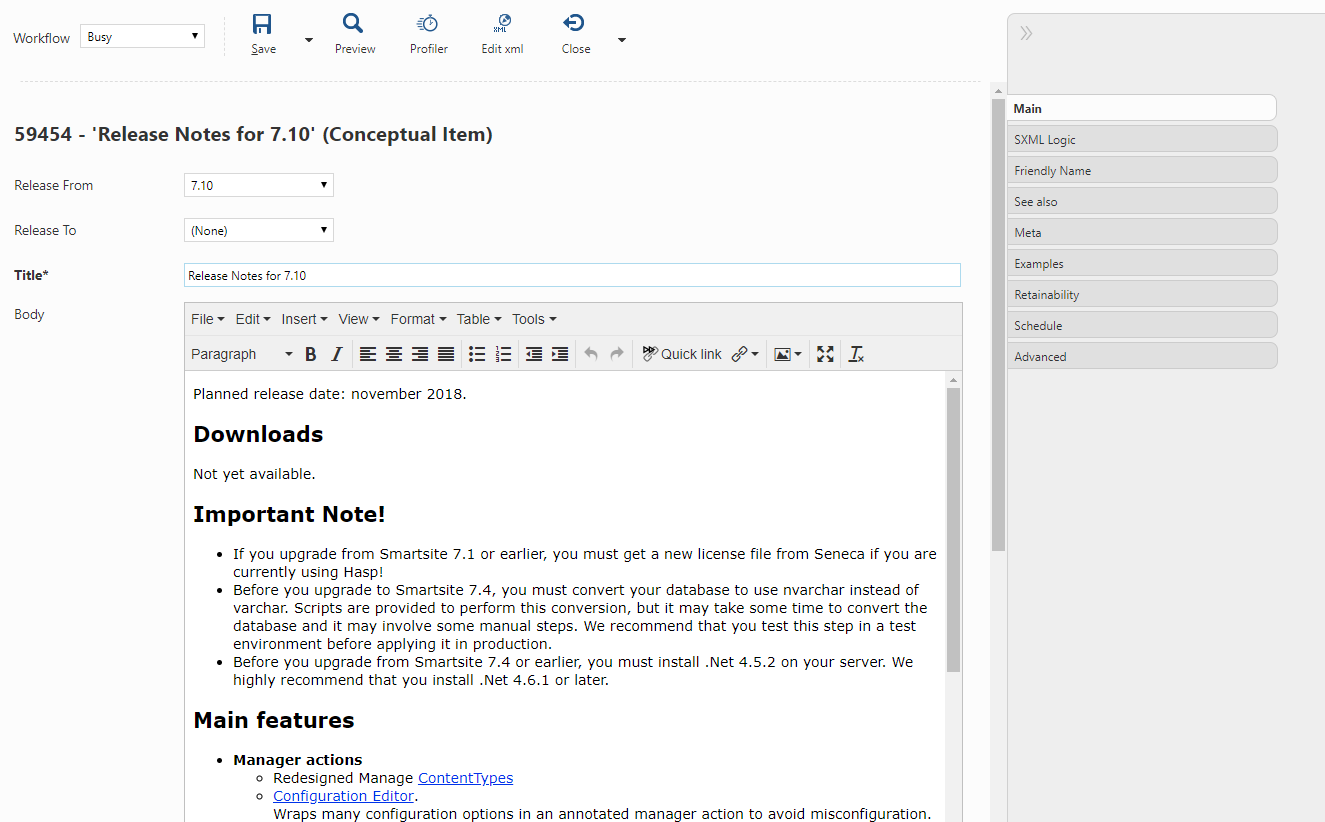
The Edit Item action is in its core "just" another DataEditor action. So, the main concepts for a DataEditor action do apply: metatype xml, dataeditor xml and the instance xml.
When you start an Edit Item action, the metatype xml is generated using the Contenttype (fields) as input.
The same goes for the dataeditor xml. Based on the user's current role and the contenttype field properties (ctfps) group / cms:group and sortindex / cms:sortindex, the dataeditor xml is generated, using these ctfps to determine the tab layout for the contenttype fields. And of course, there are a lot of other ctfps involved in generating the dataeditor xml. To name a few: cms:control, allowedit, hidden, caption, subgroup, lookuplist, lookupquery, etcetera.
The tab layout, as of Smartsite 7.10, can easily be adjusted using the Contenttype tab-layout action.
The instance xml contains the record data for the item and is actually a combination of data from both Contents and ContentVersions (for versionable fields).
Control
For each contentttype field, an appropriate control (type) must be determined. There's one ctfp which sets the control for a contenttype field unambiguos: cms:control.
However, when this ctfp has not been set for a specific contenttype field, the best matching control must be determined based on other ctfps.
The EditProgId ctfp is one of the ctfps which is taken into account in this process. But its usage should be limited, cms:control is the preferred ctfp to specify the type of control for a contenttype field.
Save
After making changes to the item, you can save the item by clicking the Save button. But first, select the (workflow) status in which you want to save the item.

The statusses shown, depends on the default type of workflow which applies for the contenttype of the item and the current status of the item.
When saving the item, the contents of the item is first validated. If one or more contenttype fields are invalid, the save operation is aborted, and the user interface of the Edit Item action is updated with the error information.
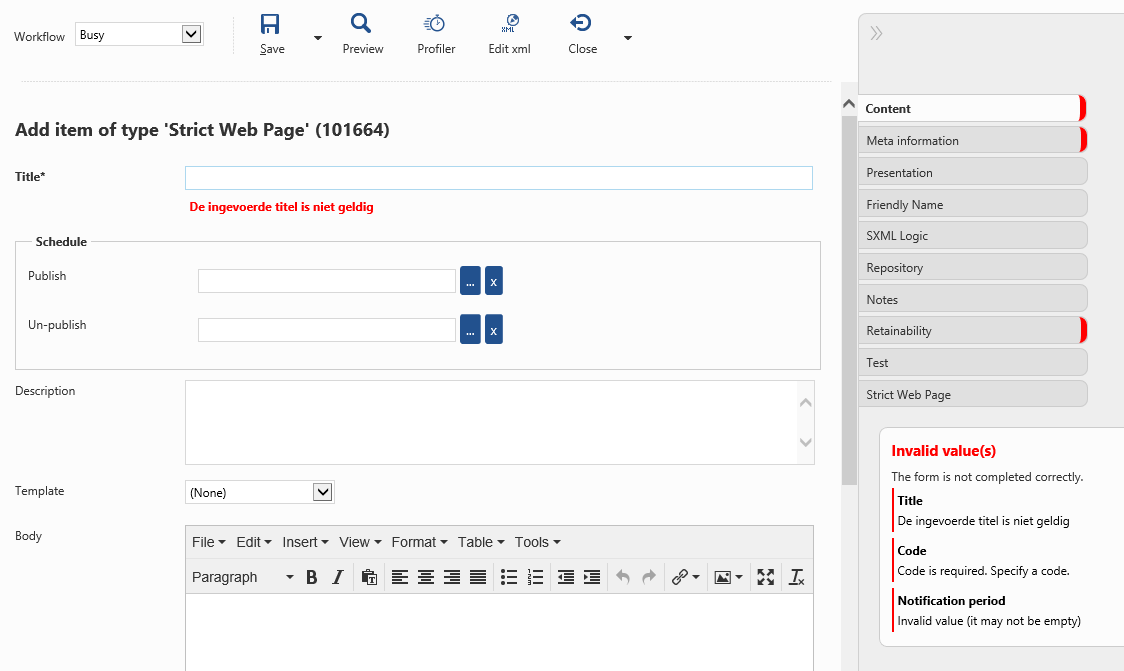
The tab buttons on the right are marked with a red border when the tab contains one or more invalid fields. Below each invalid contenttype field, an error message is shown.
And below the tab buttons, an overview of all the invalid fields is shown, which is actually a clickable list. When clicking one of the entries, the user interface switches to the tab containing the invalid field.
Notice you can set/override the error message which is shown for a specific contenttype field by means of specifying the ctfp cms:alert.
If you want to validate the contents of the item before saving it, as of Smartsite 7.9 there's a Validate button available as dropdown button underneath the Save button.
Preview
To preview the item, including any changes, click the preview button.
When there are multiple channels in which the item is available, you can switch to each of these channels using the dropdown on the left. To preview how the item will be rendered on e.g. a mobile or tablet, select an appropriate resolution from the dropdown on the right.
Profiler
To check how the render performance for the item is, click the Profiler button.
(This button is only available to users which do have the privilege mgr-PRIVILEGEPROFILER assigned.)
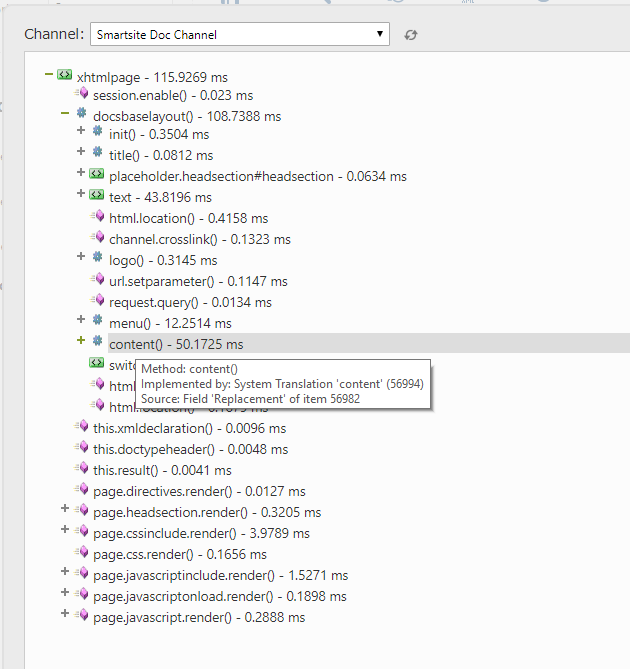
Again, when there are multiple channels in which the item is available, you can select one from the dropdown.
The profiler result shows how the item is rendered within the chosen channel. The result is in fact the instruction tree of the rendering, starting with the render template. For each instruction, the amount of time it took to execute is displayed. When you hover over an instruction, a tooltip is shown containing infomation about the instruction, such as its source.
In case the render performance of the item is an issue, you can use the instruction tree to track down what causes it.
Edit xml
The Edit xml option gives you the opportunity to copy/paste itemdata in xml format.
(This button is only available to users which do have access to the user action mgr-DATAEDITORPASTE.)
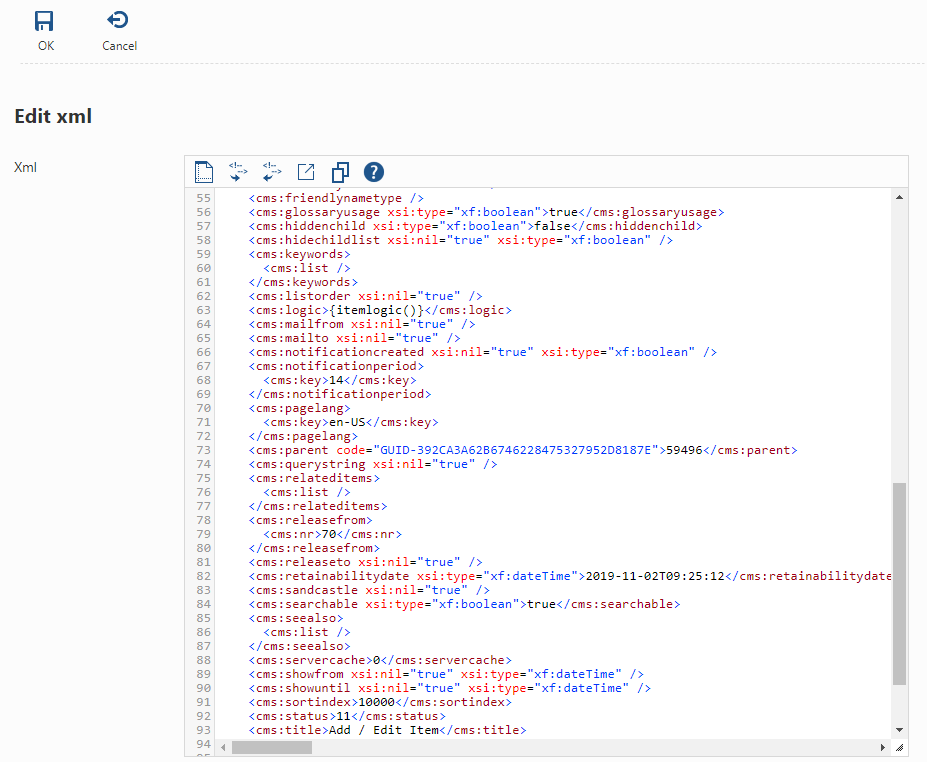
The itemdata is in fact a copy of the instance xml. You can manipulate this xml directly or copy one or more fields from another item's instance xml. Click the Ok button to update the instance xml of the item.
Close
When you don't want to save any of the changes you made, if any, just click the Close button. The Edit Item action will be closed and the itemlock on the item will be removed.
Reset
When you do have made several changes to the item but you want to go back to the state of the item before making those changes, just click the Reset button. The Reset button is available as dropdown button underneath th Close button.
Tips & tricks
The Edit Item action also support some extra features which aren't directly visible within the user interface, but which can be very useful.
- When you press the Ctrl-key while clicking the Save button, the item will be published/activated automatically, regardless of the selected workflow state.
In other words, when you want to publish/activate the item, you don't need to select the appropriate workflow state, just press and hold the Ctrl-key while clicking the Save button.
(Of course, the current user must have access rights to this workflow state.) - Normally, when you publish/activate the item, the Edit Item action is closed. When you want the Edit Item action to remain open when publishing/activating an item, just press and hold the Shift-key while clicking the Save button.
- You can directly open the Edit contenttype field action for a specific field by double-clicking the caption of the field.